> ## Documentation Index
> Fetch the complete documentation index at: https://doc.omnitechsolucoes.com.br/llms.txt
> Use this file to discover all available pages before exploring further.
# Configuração do App Google
> Guia para configurar um aplicativo Google e permitir login/cadastro via Google na sua plataforma OmniTech IA
Este documento fornece instruções para configurar um aplicativo no Google Cloud e permitir que usuários façam **login ou cadastro via Google** na sua plataforma **OmniTech IA White Label**.
## Habilitando APIs e Registro do Aplicativo
Para permitir que usuários façam login utilizando suas contas Google, é necessário criar um projeto no **Google Cloud Platform** e configurar o OAuth.\
Siga os passos abaixo para criar e configurar corretamente o seu projeto.
## 1. Acessar o Google Cloud Platform
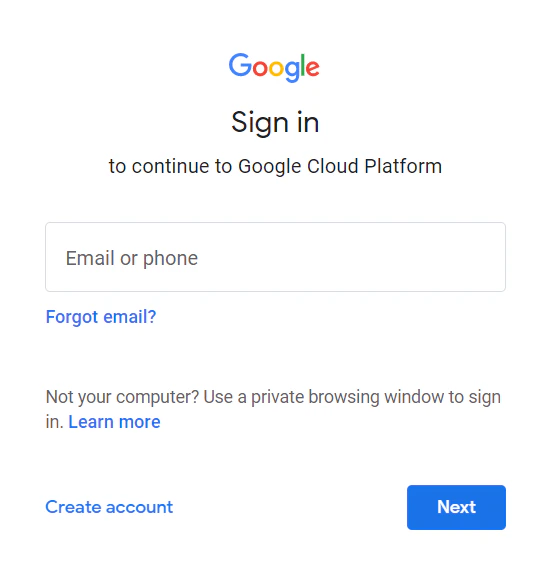
Acesse [https://console.cloud.google.com/](https://console.cloud.google.com/) e faça login para entrar no console do Google Cloud.
 ## 2. Criar um projeto
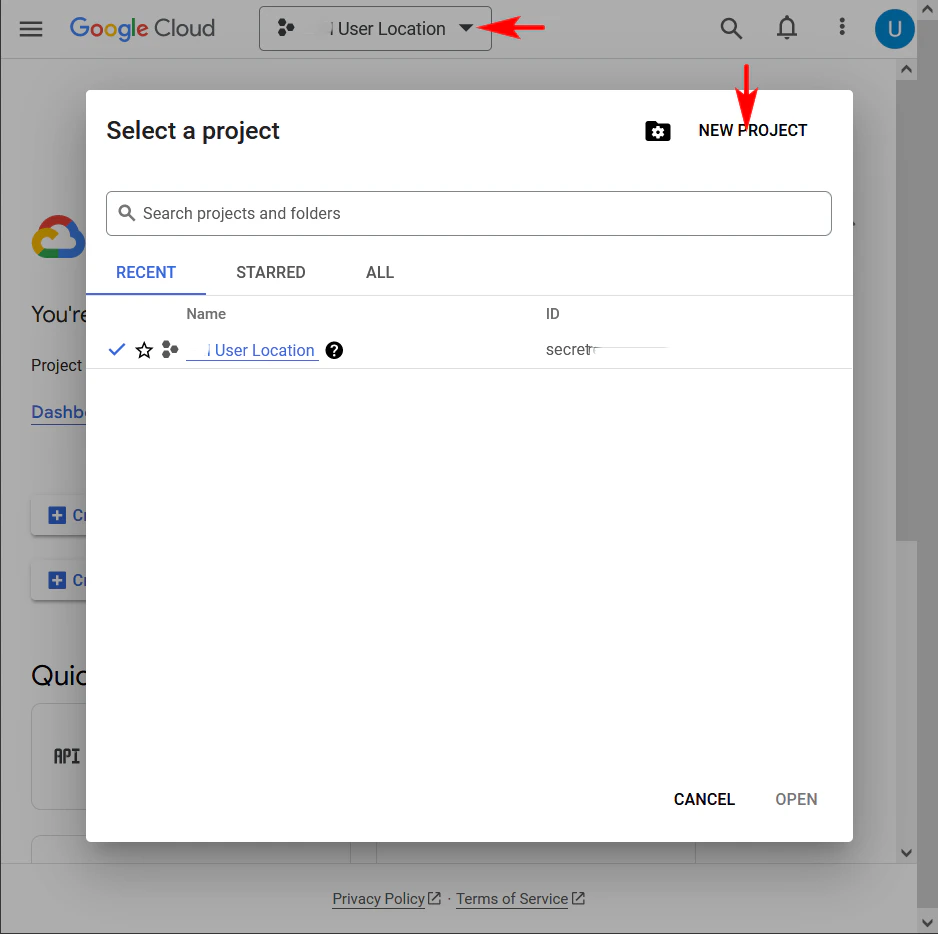
Clique no seletor de projetos no menu superior. Na janela **Selecionar um projeto**, clique em **NOVO PROJETO**.
## 2. Criar um projeto
Clique no seletor de projetos no menu superior. Na janela **Selecionar um projeto**, clique em **NOVO PROJETO**.
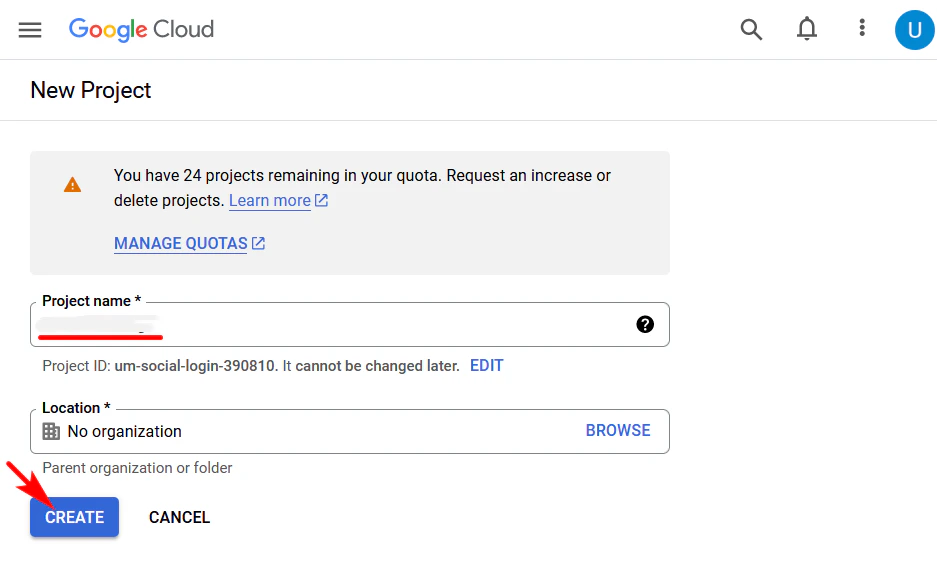
 Informe o **Nome do projeto** e clique em **CRIAR**.
 ## 3. Configurar a Tela de Consentimento OAuth
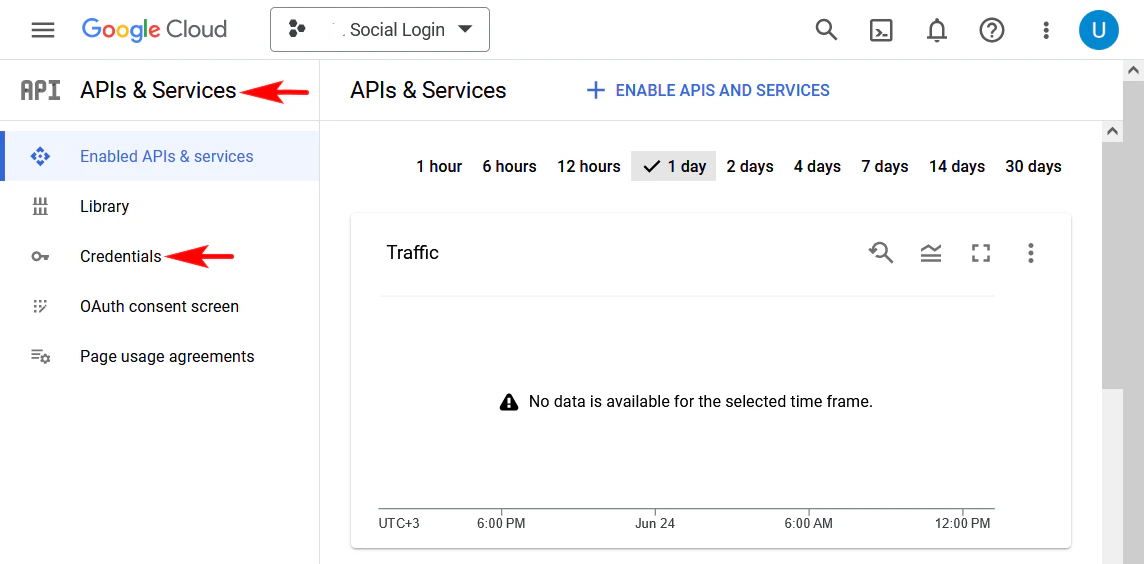
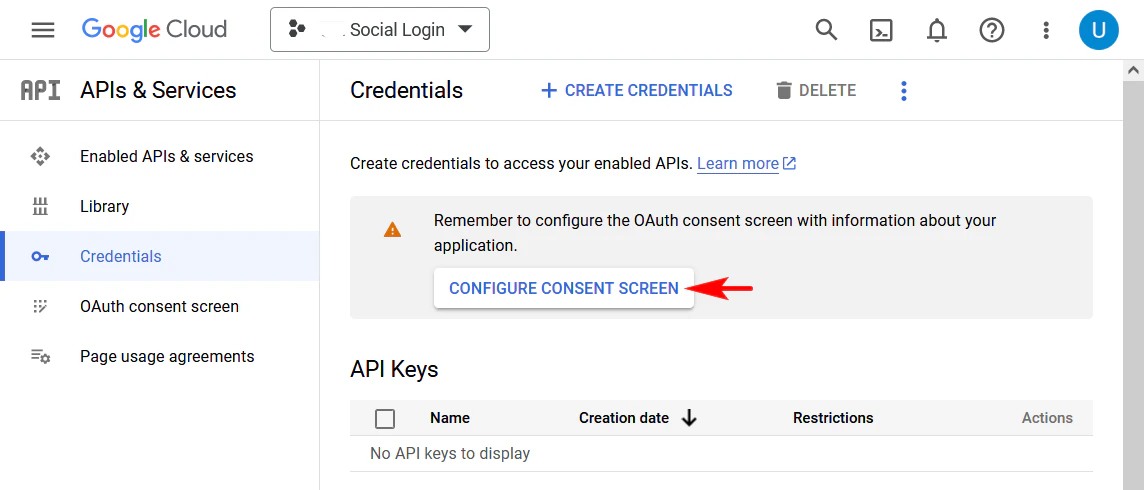
Após a criação do projeto, acesse **APIs e Serviços**.\
No menu lateral, selecione **Credenciais** e clique em **CONFIGURAR TELA DE CONSENTIMENTO**.
## 3. Configurar a Tela de Consentimento OAuth
Após a criação do projeto, acesse **APIs e Serviços**.\
No menu lateral, selecione **Credenciais** e clique em **CONFIGURAR TELA DE CONSENTIMENTO**.
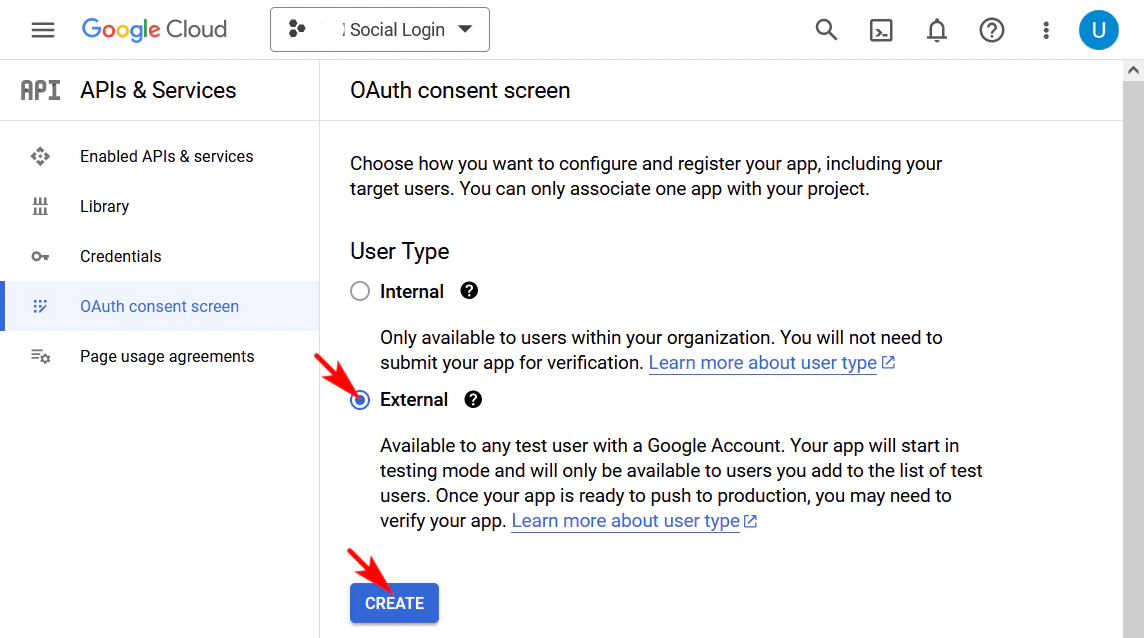
 Escolha o tipo de usuário **Externo** e clique em **CRIAR**.
 ## 4. Editar o Registro do Aplicativo
### 4.1 Tela de Consentimento OAuth
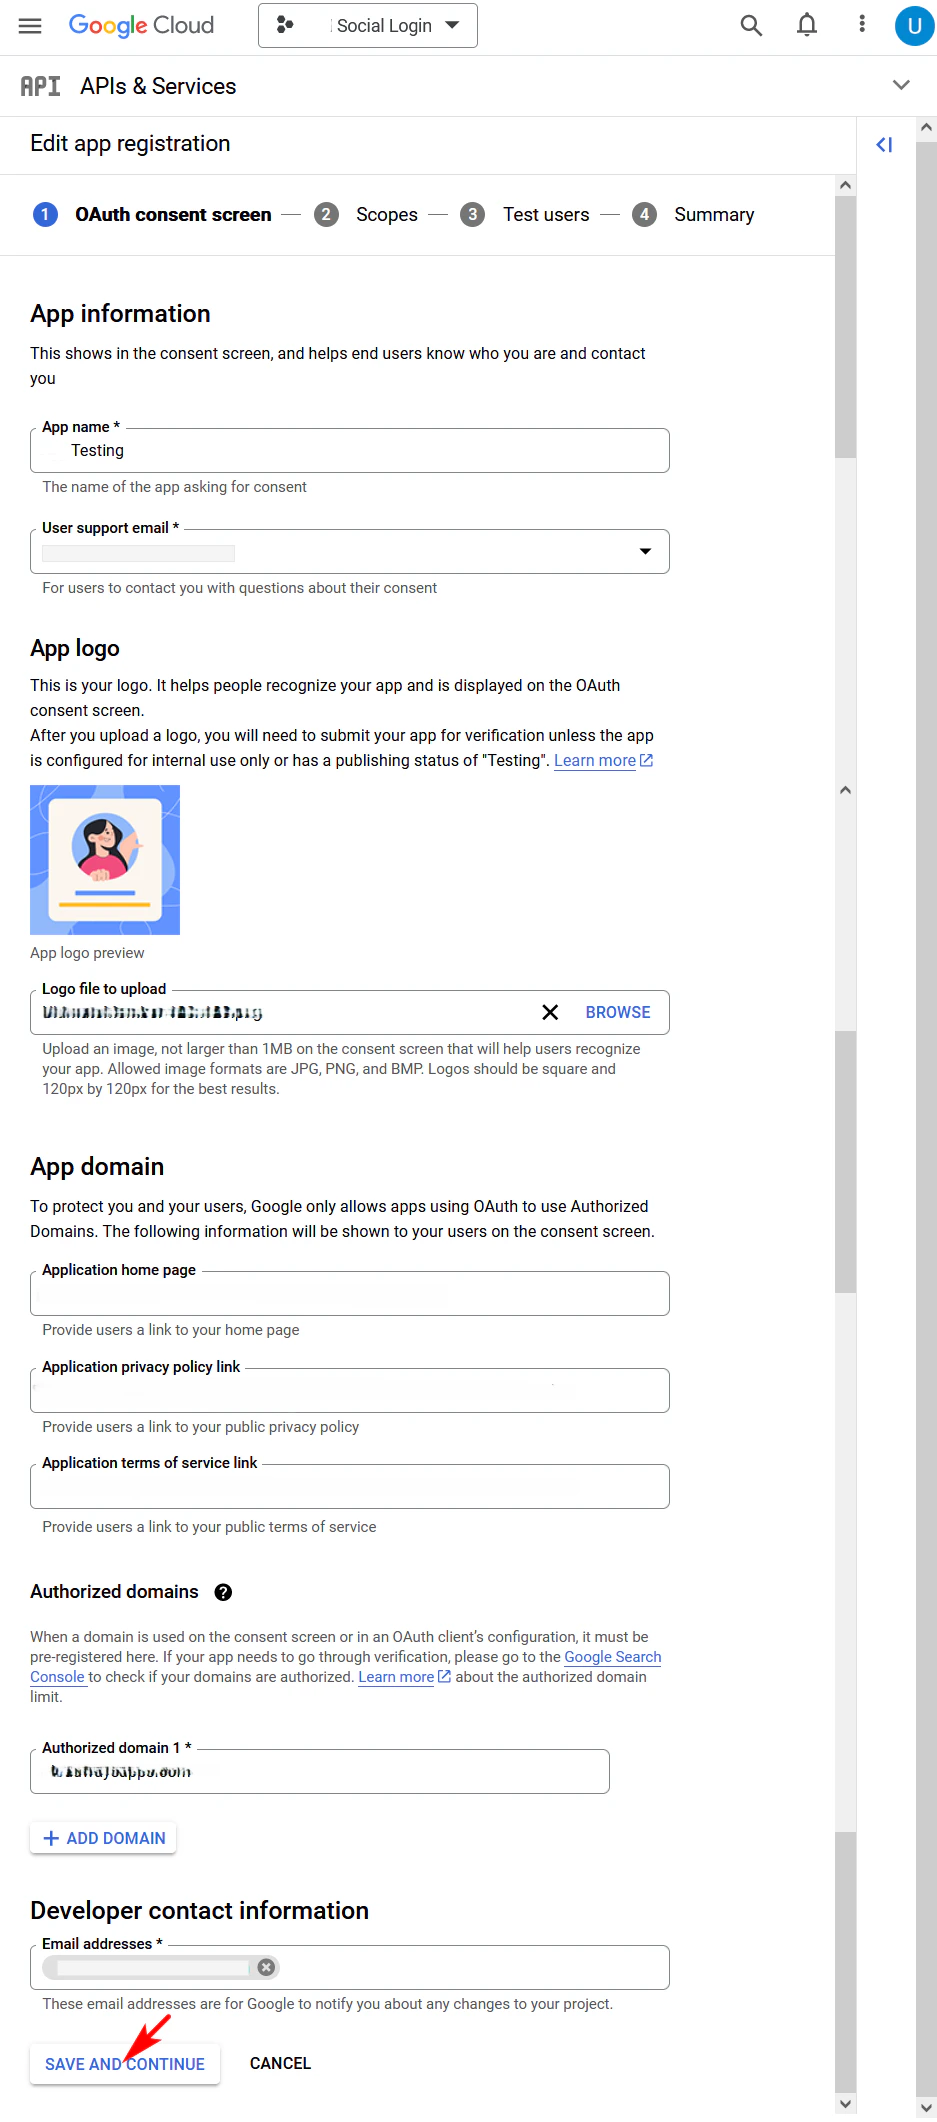
Preencha os seguintes campos:
* **Nome do aplicativo**
* **E-mail de suporte**
* **Logotipo do aplicativo**
Informe também:
* **Página inicial do aplicativo**
* **Link da política de privacidade**
* **Link dos termos de uso**
* **Domínio do site**
* **E-mails de contato**
Clique em **SALVAR E CONTINUAR** para avançar.
## 4. Editar o Registro do Aplicativo
### 4.1 Tela de Consentimento OAuth
Preencha os seguintes campos:
* **Nome do aplicativo**
* **E-mail de suporte**
* **Logotipo do aplicativo**
Informe também:
* **Página inicial do aplicativo**
* **Link da política de privacidade**
* **Link dos termos de uso**
* **Domínio do site**
* **E-mails de contato**
Clique em **SALVAR E CONTINUAR** para avançar.
 ### 4.2 Escopos (Scopes)
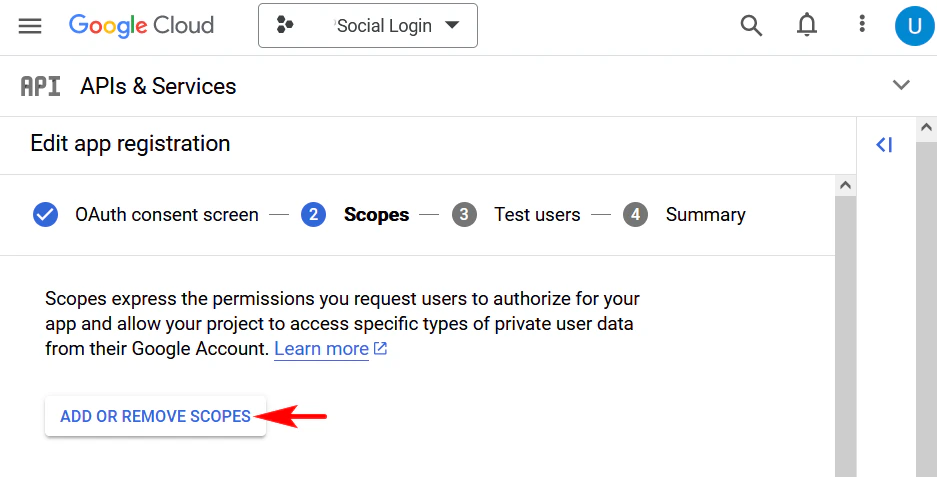
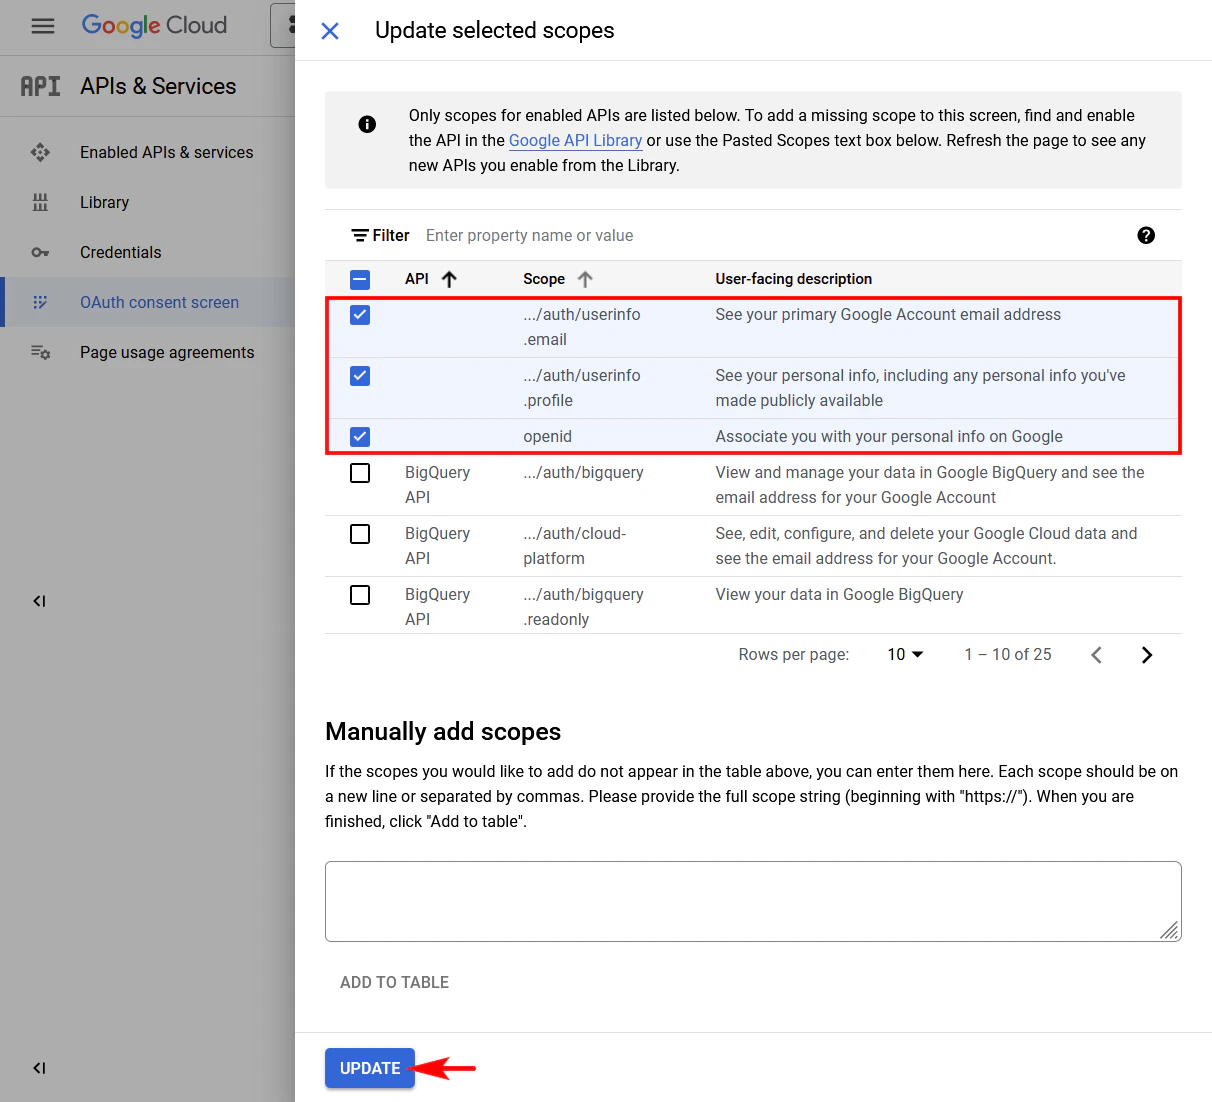
Na etapa **Escopos**, clique em **ADICIONAR OU REMOVER ESCOPOS**.
### 4.2 Escopos (Scopes)
Na etapa **Escopos**, clique em **ADICIONAR OU REMOVER ESCOPOS**.
 Selecione os três escopos obrigatórios:
* **.../auth/userinfo.email**
* **.../auth/userinfo.profile**
* **openid**
Após selecionar, clique em **ATUALIZAR**.
Selecione os três escopos obrigatórios:
* **.../auth/userinfo.email**
* **.../auth/userinfo.profile**
* **openid**
Após selecionar, clique em **ATUALIZAR**.
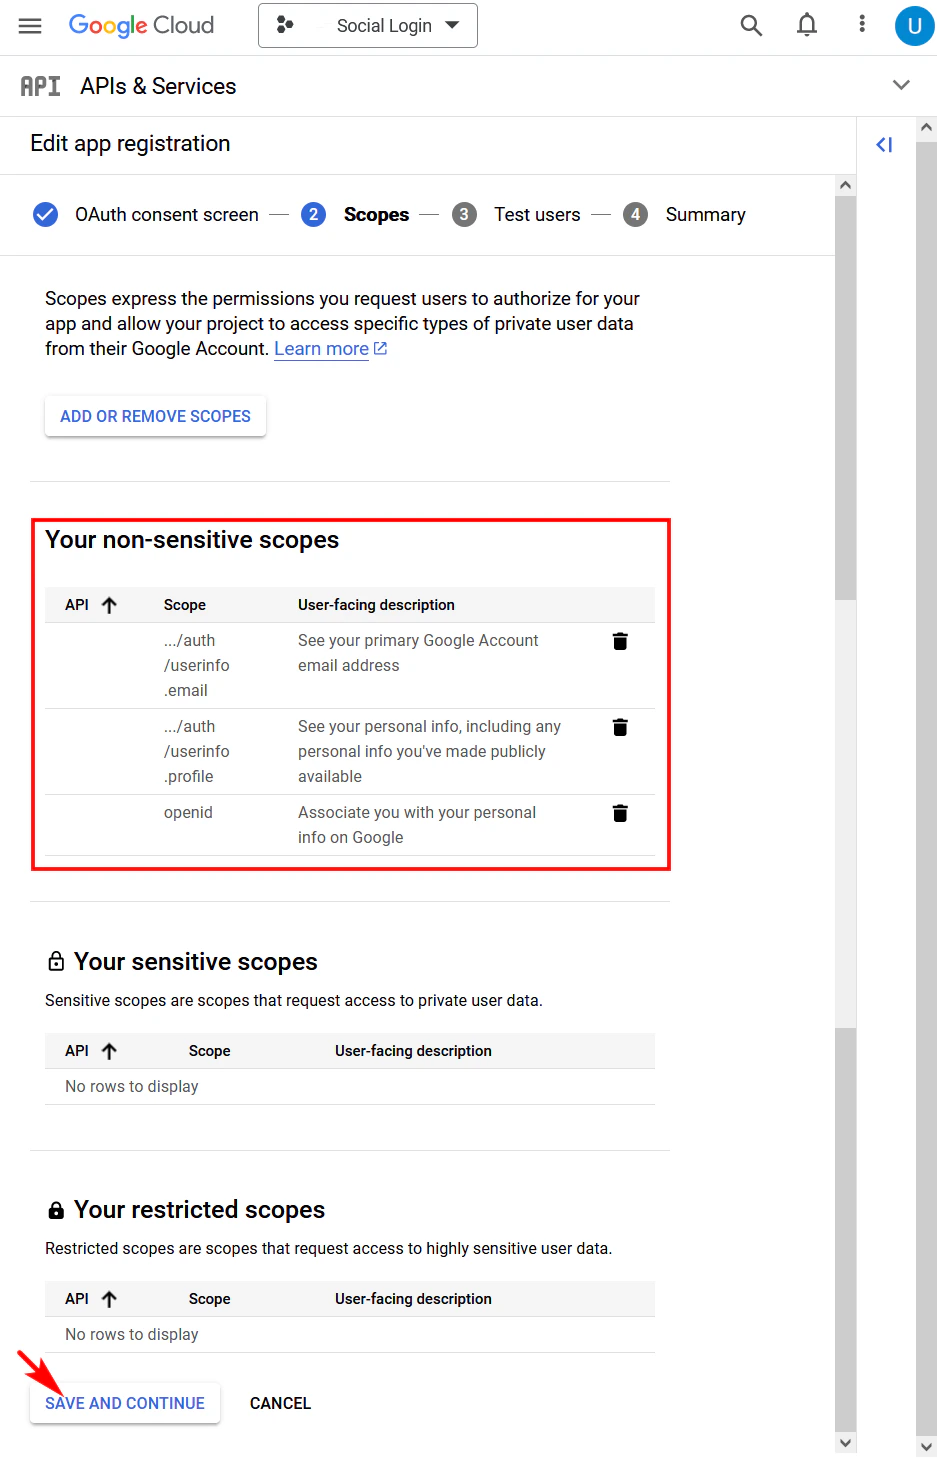
 Os escopos selecionados aparecerão na seção **Escopos não sensíveis**.\
Clique em **SALVAR E CONTINUAR** para avançar.
Os escopos selecionados aparecerão na seção **Escopos não sensíveis**.\
Clique em **SALVAR E CONTINUAR** para avançar.
 ### 4.3 Usuários de Teste
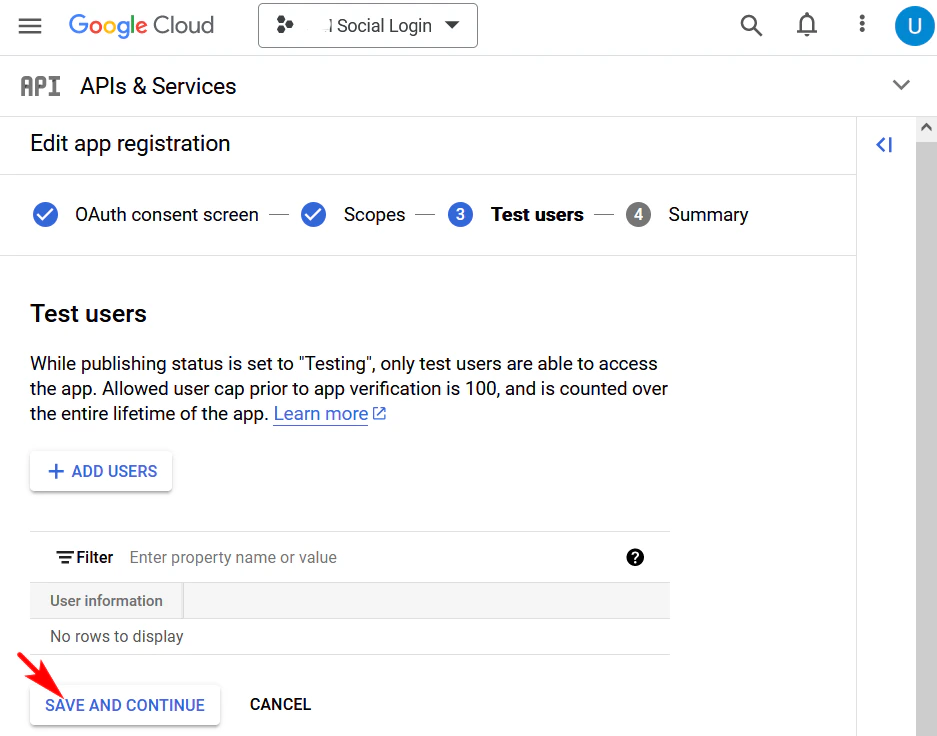
Na etapa **Usuários de teste**, você pode adicionar contas para testar o login social ou simplesmente clicar em **SALVAR E CONTINUAR**.
### 4.3 Usuários de Teste
Na etapa **Usuários de teste**, você pode adicionar contas para testar o login social ou simplesmente clicar em **SALVAR E CONTINUAR**.
 ### 4.4 Resumo
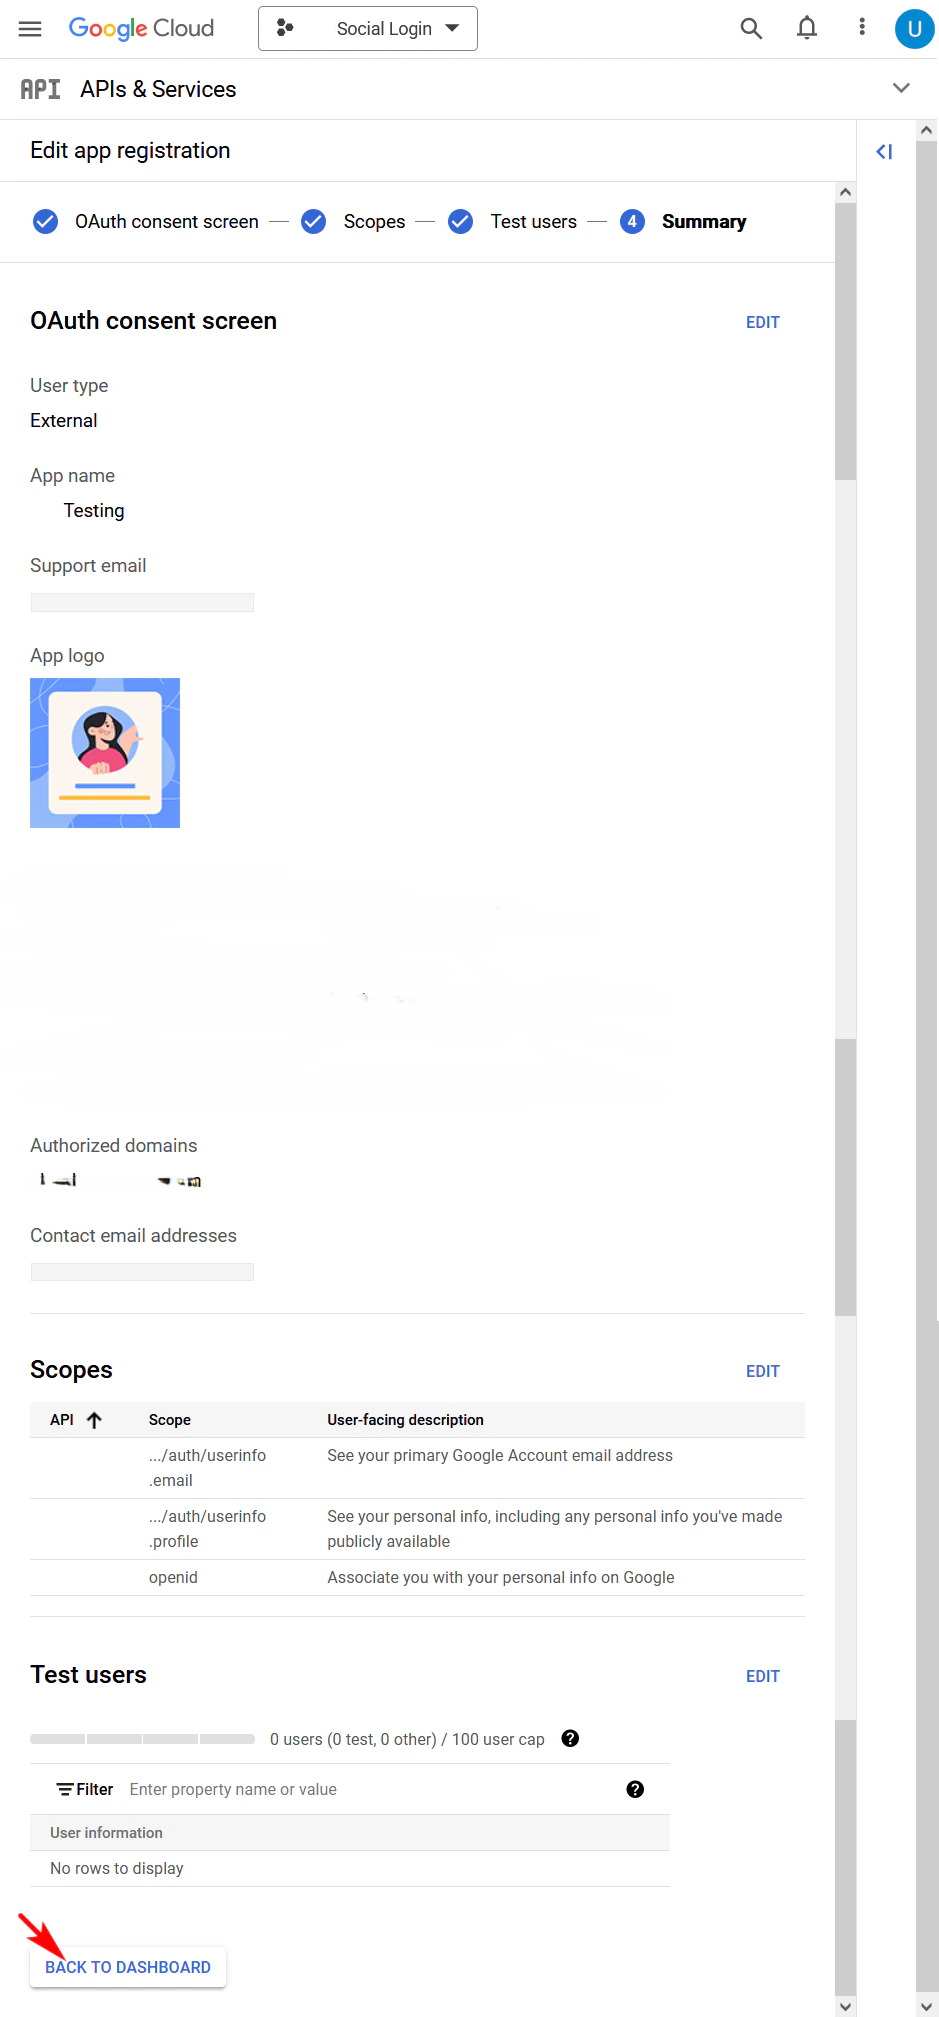
Na etapa **Resumo**, revise as informações do aplicativo e clique em **VOLTAR AO PAINEL**.
### 4.4 Resumo
Na etapa **Resumo**, revise as informações do aplicativo e clique em **VOLTAR AO PAINEL**.
 ## 5. Criar Credenciais OAuth
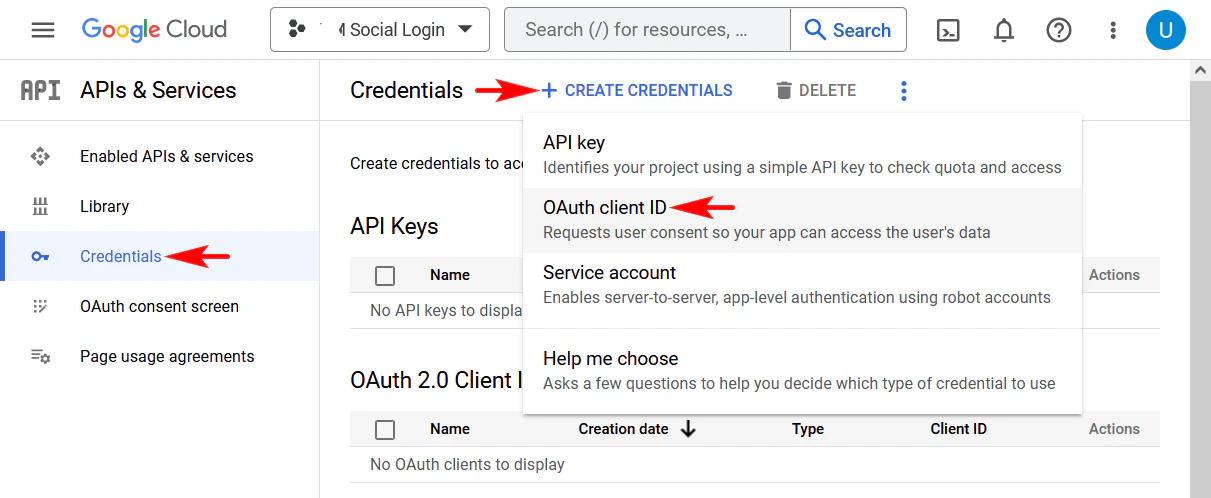
No menu lateral, selecione **Credenciais**.\
Clique em **CRIAR CREDENCIAIS** e escolha **ID do cliente OAuth**.
## 5. Criar Credenciais OAuth
No menu lateral, selecione **Credenciais**.\
Clique em **CRIAR CREDENCIAIS** e escolha **ID do cliente OAuth**.
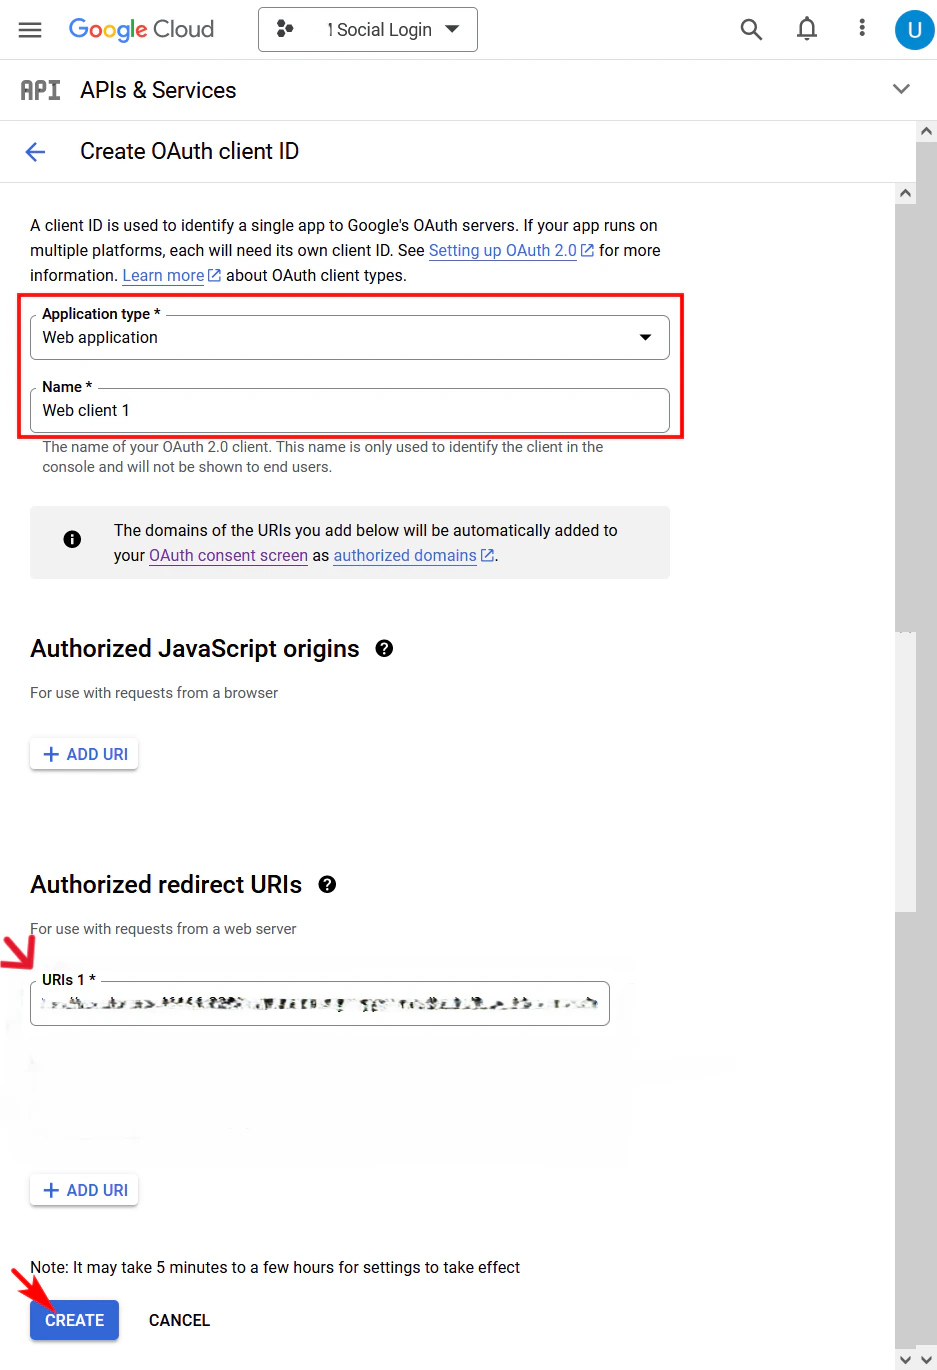
 Na tela **Criar ID do cliente OAuth**:
* Selecione **Aplicativo da Web**
* Informe um nome para o cliente OAuth
No campo **URIs de redirecionamento autorizados**, informe a URL de callback.
**Exemplo:**
* `https://seudominio.com/login/google/callback`
Por padrão, as URLs podem conter "/" no final. Remova a barra final caso sua aplicação não utilize esse padrão.
Clique em **CRIAR**.
Na tela **Criar ID do cliente OAuth**:
* Selecione **Aplicativo da Web**
* Informe um nome para o cliente OAuth
No campo **URIs de redirecionamento autorizados**, informe a URL de callback.
**Exemplo:**
* `https://seudominio.com/login/google/callback`
Por padrão, as URLs podem conter "/" no final. Remova a barra final caso sua aplicação não utilize esse padrão.
Clique em **CRIAR**.
 ## 6. Inserir as Chaves na OmniTech IA
Após a criação, será exibido o pop-up **Cliente OAuth criado**, contendo:
* **Client ID**
* **Client Secret**
## 6. Inserir as Chaves na OmniTech IA
Após a criação, será exibido o pop-up **Cliente OAuth criado**, contendo:
* **Client ID**
* **Client Secret**
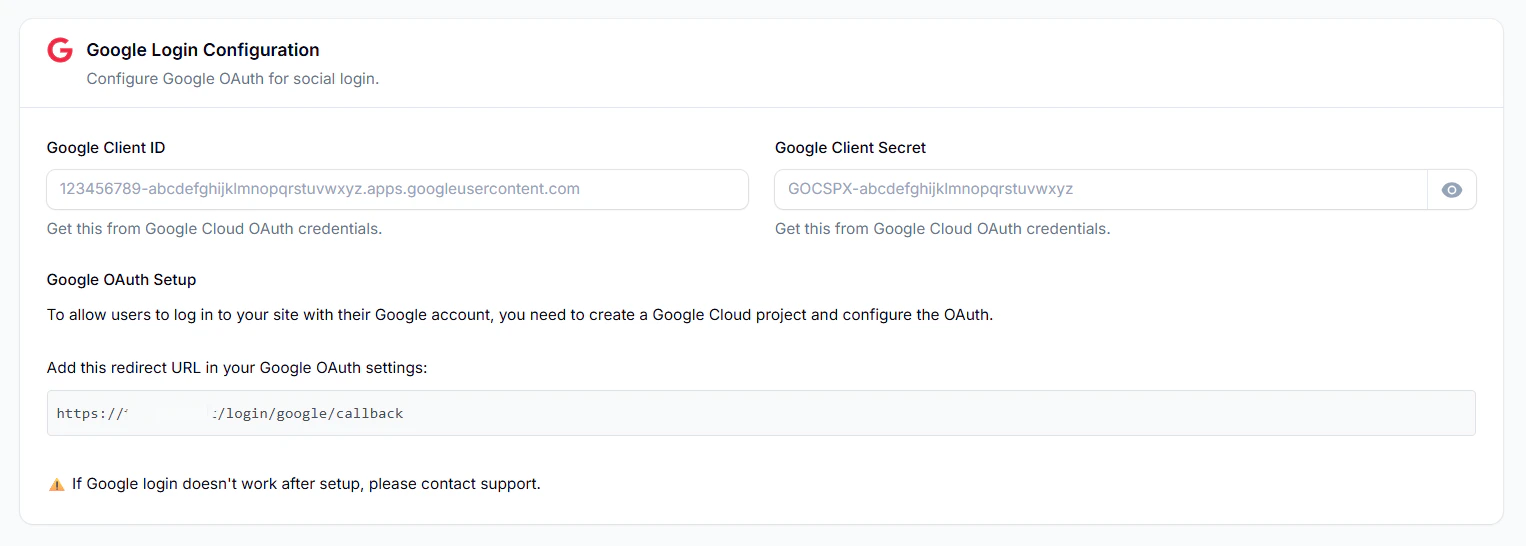
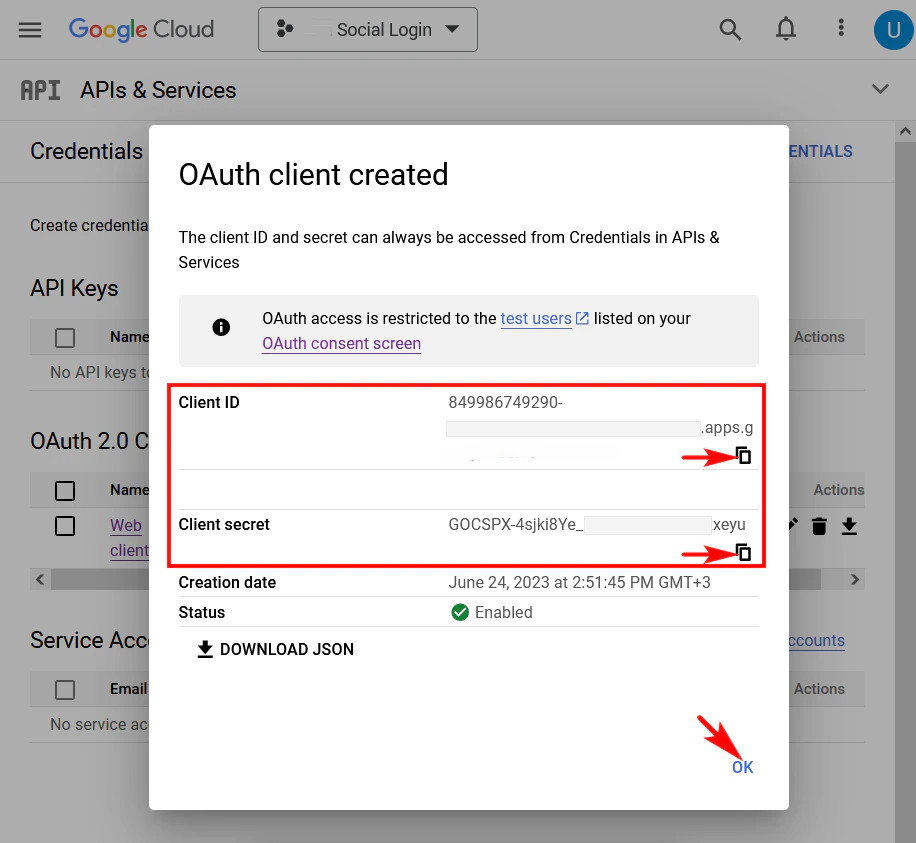 Copie essas chaves e cole nos campos correspondentes em:\
**White Label → Configurações → Logins Sociais → Google**
Copie essas chaves e cole nos campos correspondentes em:\
**White Label → Configurações → Logins Sociais → Google**
 ## Testes
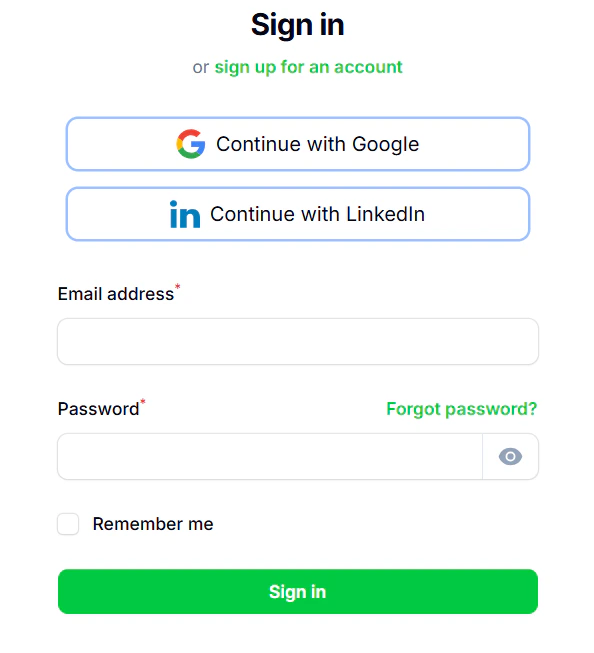
Teste o login social nas páginas de **Login** e **Cadastro**.\
Caso encontre qualquer problema, revise os passos ou entre em contato com o suporte.
## Testes
Teste o login social nas páginas de **Login** e **Cadastro**.\
Caso encontre qualquer problema, revise os passos ou entre em contato com o suporte.
 ***
**Precisa de ajuda?**\
Entre em contato com o suporte da **OmniTech IA** para auxílio em qualquer etapa da configuração.
***
**Precisa de ajuda?**\
Entre em contato com o suporte da **OmniTech IA** para auxílio em qualquer etapa da configuração.